There comes a time for many electronics enthusiasts and tinkerers when they wish they had a custom-made PCB for a project. If you enjoy a bit of crafting, the netizens over at Feminist Hacking might have a compelling solution for PCB-needy DIYers, using real clay to produce working PCBs, as shared in a blog post headed “MaKING Printed Circuit Boards with Wild Clay.”
The hacktivists behind this project didn’t just want a craft project as a source of artistic satisfaction. This is made clear in the intro to the blog, where they ponder the “open secret that the hardware in our smart devices contains not only plastics but also conflict minerals.” However, it didn’t take long to narrow down the options to come up with the idea of clay PCBs.
Article continues below
‘Prehistoric techniques of firing clay’
After some research, they learned from a pottery artisan that you can use “prehistoric techniques of firing clay in an open wood fire” to do the job. After spending two days with this craftsperson, the hacktivists learned to locally source clay, work it, and fire it to make these “natural clay PCB boards.”
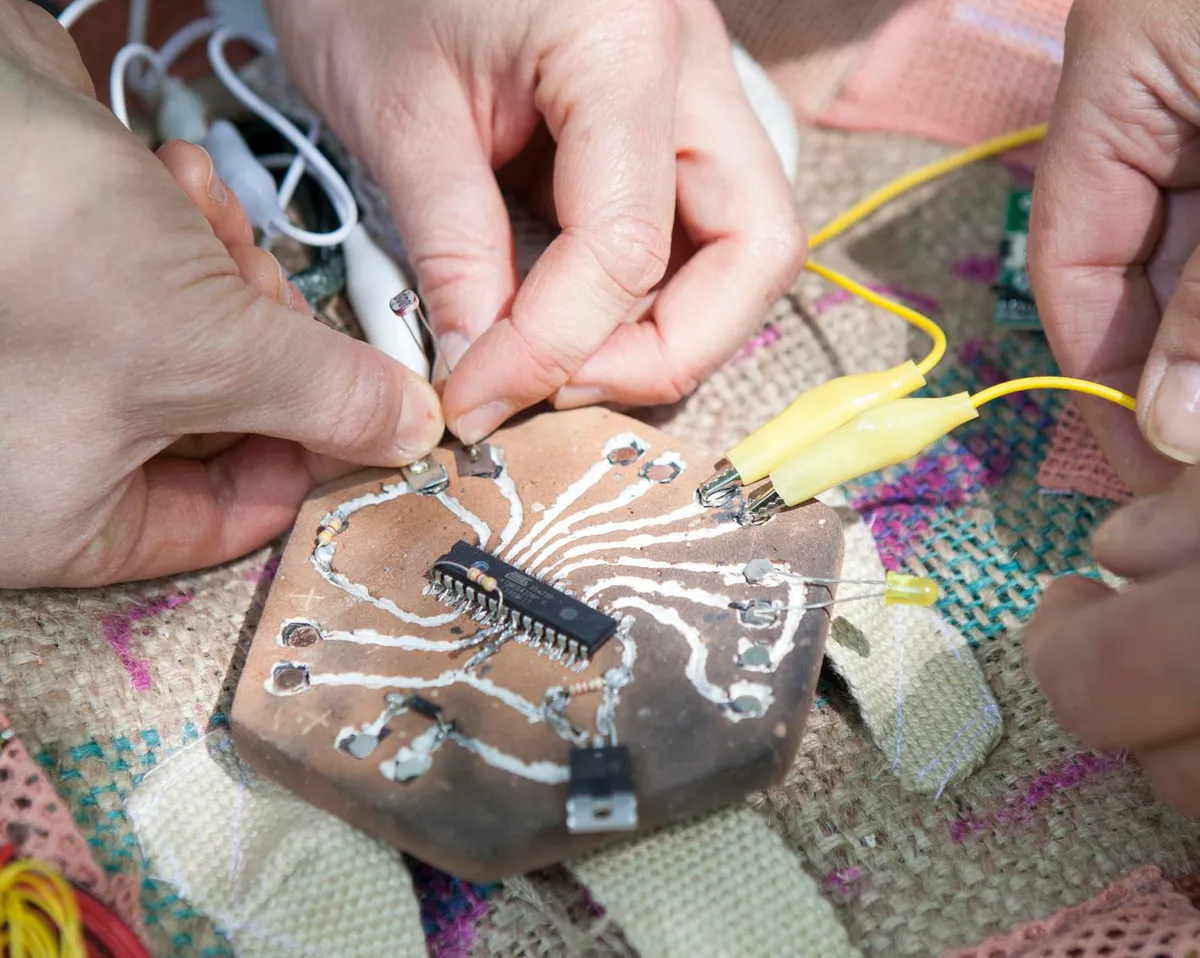
The blog gives tips for collecting and mixing clay, ready for working into rounds, with all air and impurities minimized. That’s important for uniform, consistent, well-behaved clay PCBs.
A hexagon shape was chosen as this cookie cutter “can be bought in most ceramic shops,” but only rough dimensions of approx 10x10cm (~4×4 inches) are required, not any particular shape. Originally, the hexagon was chosen to make the PCBs easy to connect, but that idea has been shelved as the fired tablet edges aren’t that precise.
Remember, we are working with less elastic and more fragile clay than you may get in a craft store. The hacktivists note it might be rough or split at the edges. As long as the inner cutter area removes this, it isn’t a problem.
Stamp PCB traces with a 3D-printed template, and paint traces in silver
Pressing the 3D-printed stamp into the clay needs some experience. It is important to balance pressure to get the optimal impression depth of roughly 1.5mm without deforming the surrounding areas. The pressed hexagon PCB tablets are dried naturally for a day before metal traces are hand-painted in the impressions.
The hacktivists avoided using a conductive gold paint they initially found, as it wasn’t really suitable for solder bonding, and came from a supply chain that wasn’t verified. Silver was the answer, specifically “a silver paint, commercialized by a German company, that is made with waste silver powder collected by jewelry makers.” More paint was applied to areas where you may expect to solder connections, later.
After the paint had dried, the clay PCBs were ready to fire. The blog wraps up with a detailed set of instructions regarding the prehistoric firing process. One aspect of the process that needed refinement from the hacktivists was the effects of clay shrinkage in the firing kiln. Clay can shrink 5% in firing, so there was a little trial and error in getting the stamp size and groove depth correct in finished PCBs.
Finally, this project is “totally open sourced,” so feel free to copy and share the details in the hacktivist blog. There’s even a PDF available, should you require one. The team also has a GitHub page with programming code, soldering instructions, and 3D printing files available.

Follow Tom’s Hardware on Google News, or add us as a preferred source, to get our latest news, analysis, & reviews in your feeds.

